Mediterranean Meatballs with Baba Ganoush and Tomato-y Harissa Sauce

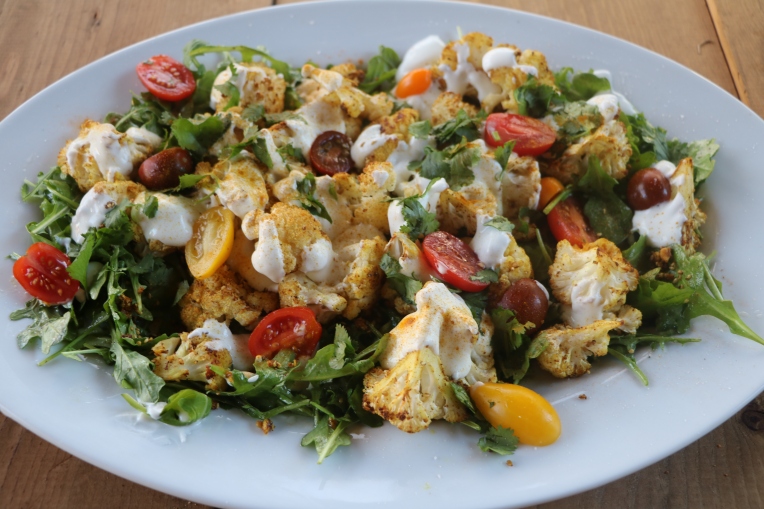
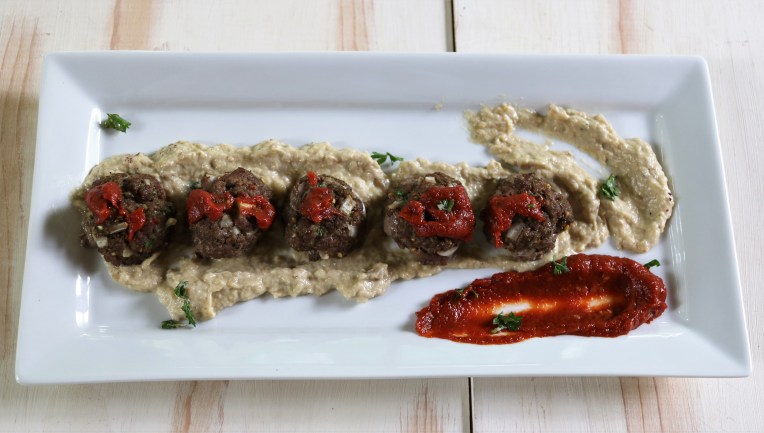
I sure wish this photo looked as good as these meatballs taste! They are delicious made with ground beef or chicken, but are fabulous if it’s possible to get a hold of some lamb. While Jenn was staying with us during the COVID shutdown, she and I had a wonderful time cooking up all kinds of fun things. She came up with the idea of combining baba ganoush and harissa sauce to complement the meatballs. Truly an inspiration!

The baba ganoush is a cheat. The eggplant is roasted in the oven, not the grill, so if you are craving more of a smoky taste – add some smoked paprika.

According to you spiciness tolerance, adjust the amounts of tomato paste and harissa in the tomato-y sauce.

This would be great as part of a small plate type of spread or individual meatball appetizers besides being a really yummy main dish.

Mediterranean-ish Meatballs – Yields about 12 Meatballs

Ingredients:

1 pound ground beef, chicken or lamb

2 good sized green onions, sliced

2 garlic cloves, finely minced or put through a press

2 tablespoons green za’atar (I use Ziyad brand because I can get it at the Mediterranean grocery by my house or here on Amazon)

2 tablespoons fresh lemon juice

1 teaspoon cumin

1 egg, slightly beaten

1/2 teaspoon salt

1/4 teaspoon pepper

Directions:

Preheat oven to 425 degrees.

Place all ingredients in a bowl and gently mix.

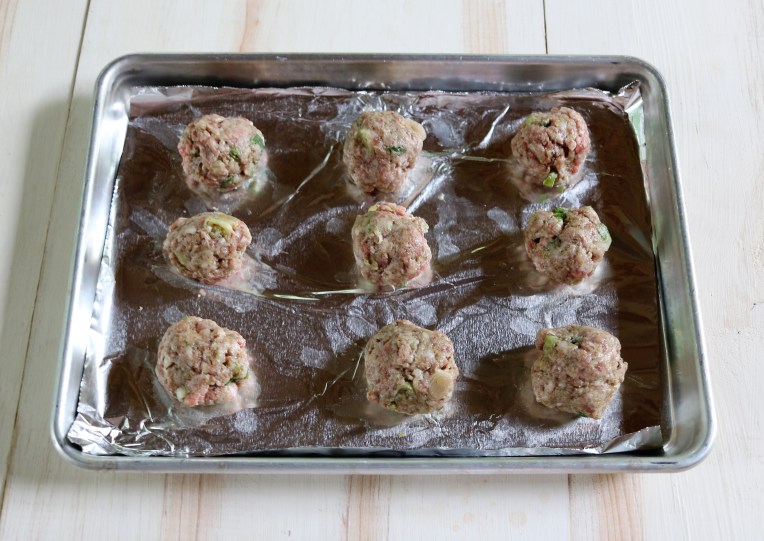
Cover a sheet pan with foil or parchment paper.

Shape the meat mixture into walnut sized balls.

Bake for 15 minutes. Meatballs should be lightly browned and when one is sliced in half, it should be cooked through out.

Serve with baba ganoush and tomato-y harissa sauce, recipes below.

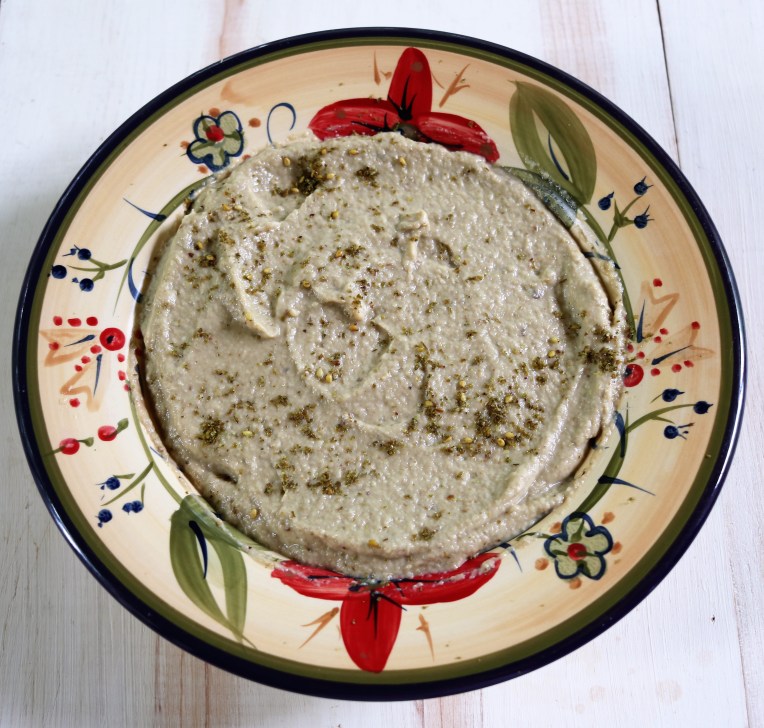
Baba Ganoush – Makes About Two Cups

Ingredients:

2 medium eggplants

2 tablespoons lemon juice

2 tablespoons tahini

1/2 teaspoon salt

1/4 teaspoon ground cumin

1/4 cup olive oil

2 garlic cloves, minced or put through a press

If desired, something to sprinkle on top such as sumac, za’atar or parsley

Since this is baked, not grilled, add 1/4 teaspoon smoked paprika if a smoky taste is desired.

Directions:

Preheat oven to 450 degrees.

Line a baking sheet with parchment paper or foil and spray with a little non-stick cooking oil or wipe the surface with a bit of olive oil.

Bake for 30 to 40 minutes or until the skin collapses inward when its pressed.

Let the eggplant cool for a few minutes, scrap out the flesh into a colander. Place the colander over a bowl. Smoosh it down and let it sit for 5 to 7 minutes. Discard the water in the bowl. Place the eggplant in a food processor. Add the lemon juice, tahini, salt and cumin.

Turn on food processor and slowly add the olive oil. Turn off processor, put the mixture in a bowl and stir in the garlic.

Garnish with smoked paprika, sumac, za’atar or parsley.

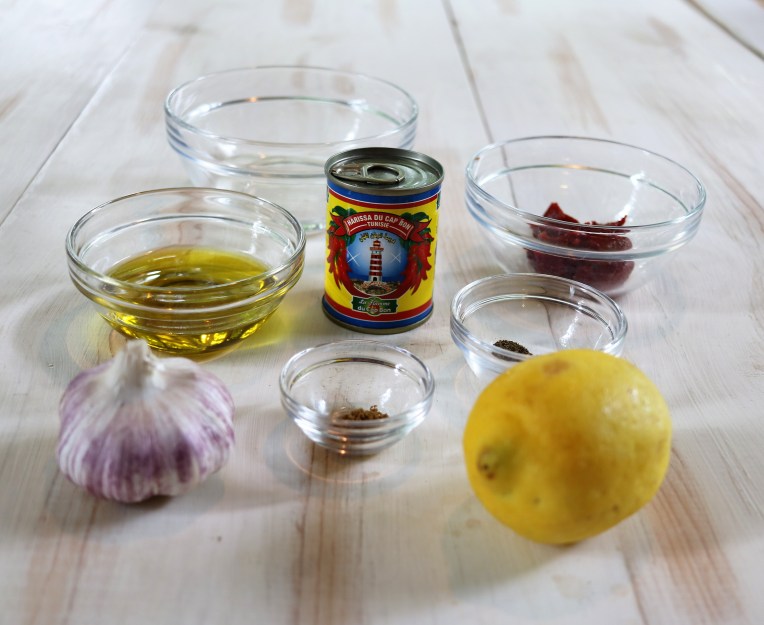
Tomato-y Harissa Sauce – Makes about 1/2 cup

Ingredients:

2 to 3 tablespoons tomato paste – adjust with regard to how spicy the harissa is, according to personal preference.

1 to 2 tablespoons harissa – according to the amount of spice desired – I love it when I can get harissa from the Middle Eastern grocery store but most of the time I use Mina brand from Whole Foods or Amazon

4 garlic cloves, finely minced or put through a press

3 tablespoons white vinegar

2 tablespoons olive oil

1/2 teaspoon ground cumin

1/2 teaspoon salt

1/4 teaspoon black pepper

Directions:

Place all ingredients in bowl and stir until well combined. Heat on stove or zap in the microwave until hot.

This is very good on roasted or grilled vegetables as well as the meatballs above.

I’d love to keep in touch – let me know if you try this!


Pin It!

Food Is an Art Form: Feast of Fish and Veg for Eyes and Palate

A couple of weeks ago we visited our friend, Polly Castor, who lives in Connecticut. She is an artist in every sense of the word.

Polly has an abundance of energy; she blogs, paints, throws pottery, writes poems and boy does she cook! But that comes later in this post.

She currently has a huge one woman show with 80 paintings at the Community Arts Center in Southington, Connecticut. As you can see her paintings are full of movement and light and the show is open to the public until October 31. The works have wonderful names such as “July” (left bottom, above) and “Confidence” (right bottom, above). I honestly was intoxicated with the feast my eyes were devouring!

Her home is filled with the gorgeous pottery she designs. I actually own the sister to the piece the carrot is resting on. She sells the pottery as well as the paintings.

After we viewed the show, we went back to Polly’s house and she cooked up an absolutely delicious meal. But not only did it taste good – it was beautiful to look at. It was like we were eating edible art! The main was fish in a luxurious aioli type sauce – Mustard Roasted Tilapia It was accompanied by  Caramelized Butternut Squash which was so good that Roy had a second helping. The  salad with Roasted Beets, blood oranges, carrots, radish, jicama, blueberries, oak leaf lettuce had a great Strawberry Basil Dressing. For dessert, which – gasp! – I had two pieces, was Ginger, Carrot, Hazelnut Cake with Molasses Frosting.

Click on the links above to get to the recipes on Polly’s blog.

And if you are anywhere near Southington, Connecticut get yourself over to Polly’s show and feast your eyes!


And just for fun…


Delicious Dukkah Roasted Cauliflower Salad

img_4397

Is this a salad? Or is it a side? It doesn’t matter because it is delicious! In fact, it could be a main dish and I would be happy. What makes it so good is that the cauliflower is roasted with an addictive seasoning from Egypt called Dukkah. I had been seeing it mentioned in foodie magazines and then I stumbled on it in a spice blend shop in Melbourne, Australia.

img_6151

Of course I had to try it. We all loved it with crusty bread dipped in olive oil, and then the Dukkah. It was even good sprinkled on our breakfast of hard boiled eggs in our Airbnb. Earlier in the trip we had eaten roasted cauliflower atop a salad with yogurt sauce; I wondered how cauliflower would taste if it was sprinkled with Dukkah before it was roasted… It turned out to be a winner! Below is a recipe for basic Dukkah. As you can see, there are options listed to make variations. Following that is the cauliflower salad recipe. The lemon & oil salad dressing and yogurt sauce take the whole thing over the top – enjoy!

Basic Dukkah Recipe

1 cup chopped nuts (Australian tend to use hazelnuts, others use pistachios and/or almonds)

1/2 cup sesame seeds

2 teaspoons cumin seeds

2 teaspoons coriander seeds

2 teaspoons pepper

1 teaspoon coarse sea salt

Other possible additions:

1 teaspoons turmeric powder

1 teaspoons chili powder

1 teaspoon paprika

1/2 teaspoon  ground cinnamon

1/2 teaspoon ground ginger

1/2 teaspoon ground nutmeg

1/2 teaspoon ground cloves

dukkah-collage

Heat the oven to 350 degrees. Line a baking sheet with parchment paper and spread the nuts out on it. Bake the nuts for five minutes, watching them carefully so they get brown around the edges but don’t burn. Set them aside and let them cool.

Place the seeds in a skillet and over medium heat, stir them until they start to brown. They may pop! Set them aside and let them cool.

Place the nuts in a food processor and pulse a few times until crumbly. Do not let it become a paste. Place in a mixing bowl. Process the coriander and cumin seeds until ground. Add them to the mixing bowl, along with the sesame seeds, salt, pepper and any additional spices and stir to combine.

Serve with olive oil and crusty bread. Use as a breading for chicken or fish. Or make the tasty cauliflower dish below:

Dukkah Roasted Cauliflower Salad – Serves Four

img_4371

Ingredients:

For the roasted cauliflower:

1 head cauliflower

3 tablespoons Dukkah – recipe above

2 tablespoons olive oil

Preheat oven to 350 degrees.  Line a baking sheet with parchment paper. Wash and cut the cauliflower into florets. Place them in a single layer on the parchment paper. Sprinkle the florets with the olive oil and Dukkah. Bake for 30 minutes. Cauliflower should be tender, easily pierced with a fork, and browned on the edges.

img_4352

For the yogurt sauce:

1/2 Greek yogurt

1/4 cup olive oil

2 teaspoons lemon juice

1/2 teaspoon salt

Whisk all ingredients together.

For the salad:

6 cups arugula

1/2 cup olive oil

1/4 cup lemon juice

1/2 teaspoon cumin

1/2 teaspoon salt

1/4 teaspoon pepper

Place the arugula in a large bowl. Whisk the rest of the ingredients together. Pour enough dressing over the arugula to coat it, but not drench it. Reserve the rest of the dressing. (It’s great drizzled over vegetables or as a dressing on any kind of salad.)

For Garnish:

2 tablespoons chopped cilantro

1 cup cherry tomatoes, sliced in half

img_4404

To assemble the dish, place the dressed arugula salad on a serving platter. Place the roasted cauliflower on top. Drizzle some of the yogurt sauce on top. Scatter the chopped cilantro and cherry tomatoes over the top. Serve immediately and pass the remaining yogurt sauce at the table.


Another Printable Recipe Archives     fb     tweet (2)     pin     me     instagram_2016_icon


Tradition Hanukkah Recipes

img_1814

For the past five Decembers, I have had an absolutely wonderful time writing some kind of holiday recipe article for a local area magazine I contribute to. The articles usually involve multiple dishes and a whole lot of photography. Since The deadline is in November, a few times my daughter Jennifer was home for Thanksgiving and assisted me with the cooking and snapping of pictures. We always start out calmly and neatly, but by the end of the day it all somehow gets away from us and the kitchen starts to look like something exploded in it! The ultimate time was when I was featuring each writers favorite seasonal recipe. Jenny and I began the task of making around 15 different items such as cookies in the shape of bows, stuffing spiked with sherry and the best pull apart caramel nut rolls we ever experienced. We worked all day and into the early evening and by the time we were done, every pan let alone ounce of flour had been used!

This year I was asked to highlight traditional Hanukkah recipes. My Jewish friends happily gave me some of their family favorites. I have to say, everything was delicious! The fried potato pancakes and jelly doughnuts celebrate the miracle of The Festival of light; a single cruse of oil lasted for eight nights in a temple reclaimed by faithful Jews. The cookies are made from a fabulous cream cheese dough and the vegetable dish is now a new favorite in our family. But the best has got to be the beef brisket! The left overs make wonderful filling for street tacos or, with BBQ sauce, a great sandwich!

img_1654

img_5820

img_1799

img_5822

img_1771

img_5821

img_1727

img_5824

img_1710

img_5823


Another Printable Recipe Archives     fb     tweet (2)     pin     me     instagram_2016_icon

Breakfast at Tiffany’s Bridal Shower

invite

Last weekend my daughter Caroline was the guest of honor at a fabulous bridal shower. The invitations and decor reflected the theme “Breakfast at Tiffany’s”. My dear friends Marilyn and Mary hosted the shower along with some help from another wonderful friend, Jan. Marilyn’s home was the perfect place for the event; not only is it one of the most beautifully decorated houses ever to be seen, but even some of the walls sport Tiffany blue!

img_1871

Those iconic Tiffany shopping bags were scattered all over.

img_1864

I loved the little favor bags filled with candies in that turquoise blue color – they looked like miniature Tiffany bags.

img_1884

Some of the tables had a pop of orange-red color coming from the center piece flower arrangements.

img_1873

Aren’t those polka dot napkins fun? I think they prevented the look from being too “stuffy”.

Of course, I got the recipes!

img_1876

Menu:

Egg Casserole with Sausage

Blueberry Buckle Coffee Cake

Apple and Cherry Turnovers

Banana Nut Bread

Fruit


img_1879

Egg Casserole – makes a 9 x 13 pan full

Ingredients:

6 eggs

2 cups milk

1 teaspoon salt*

1 teaspoon dry mustard

1 pound sausage**

1 cup grated cheddar cheese

2 slices bread, cubed

Directions:

Brown sausage and drain off grease. Mix eggs, milk, salt, mustard. Add sausage, cheese, and bread. Combine and pour into greased 9″ x 13″ pan. Cover and refrigerate overnight. Bake 45-60 minutes in 350 degree oven, uncovered.

* When I make this, I reduce salt to 1/2 teaspoon.

**As you can see by photo, Mary used sausage links instead of ground sausage.


img_1882

Blueberry Buckle Coffee Cake – makes a 9″ x 13″ pan

Ingredients:

4 cups flour

1/4 cup baking powder

1 teaspoon salt

1 1/2 cups sugar

1/2 cup butter

2 large eggs

2 teaspoons vanilla extract

1 cup milk

4 cups fresh or frozen blueberries

Topping:

2/3 cup sugar

1 cup flour

2 teaspoons cinnamon

1/4 teaspoon salt

1/2 cup butter


Instructions:

Preheat the oven to 375°F. Lightly grease a 9″ x 13″ pan.

Make the topping: Mix the sugar, flour, cinnamon, and salt in a small bowl. Cut or rub in the butter with the side of a fork, two knives or your finger tips until it reaches a crumbly state. Set aside

Blend the flour, baking powder, and salt together in a medium-sized mixing bowl. In a separate bowl, beat together the sugar, butter, egg, and vanilla. Alternately add the milk and the flour mixture to the sugar/butter mixture, ending with flour. Add blueberries. Stir only enough to blend. Pour the batter into the prepared pan. Sprinkle the topping over the batter. Bake the cake for 40 to 45 minutes, or until a toothpick or knife inserted into the center comes out clean. Remove the cake from the oven, and set it on a rack to cool for 10 minutes.


img_1877

Cherry Turnovers – yields two dozen

Ingredients:

3 (8 count) cans crescent rolls

2 (21 oz.) cans – one cherry and one apple, pie filling

2 cups confectioner’s sugar

2 tablespoons melted butter

2 to 3 tablespoons milk


Directions:

Preheat oven to 375 degrees. Grease two (12 count) muffin pans. Place each crescent roll dough triangle in the middle of a muffin well so edges are hanging out. Spoon a little less than 2 tablespoons of pie filling on each. Fold the hanging edges over the top of the pie filling. Bake 10 minutes or until the dough is raised and golden brown. While the turnovers are baking, whisk together the confectioner’s sugar, butter, and enough of the milk to make the glaze smooth. Drizzle over the baked turnovers. Best served warm.


Another Printable Recipe Archives     fb     tweet (2)     pin     me     instagram_2016_icon

Eating Out in Charleston: A Cautionary Tale

FotorCreated (1)

About a month ago, we spent a few days in Charleston.  I was surprised how much I loved it; the historic neighborhoods have charming architecture and there are so many opportunities to visit historic places such as Fort Sumter and actual plantation sites. I recorded much of our Charleston adventures in a post HERE.  One of the things we love to do when we travel is explore local eateries and discover the dishes a region is known for. Several people, including a high school friend of Roy’s who lives there and  Peg Moore, Chief Culinary Correspondent at the Charleston Mercury (who I was thrilled to meet), gave us suggestions of “must try” restaurants. It makes sense that these same places were also listed high up on Trip Advisor.  For the curious, here is the recommendations we were given:  Amen Street Fish & Raw Bar, Hanks Seafood Restaurant, Hominy Grill, McGrady’s, Magnolias, and SNOB – Slightly, North of Broad. Guess how many of these famed establishments we got to eat at? Just one. Turns out reservations are a pretty big deal! We showed up at Hanks on a Tuesday at 5 pm. after being turned away a few days earlier. Ninety-nine percent of the tables were empty. We were sure we would be able to get in, but were told that the only place we could be seated was on high stools at the large community table. We wondered  if our wind blown look after visiting Fort Sumter had something to do with it as we turned down the offer. Their menu was way too expensive to feel like we were dining at a lunch counter. We wandered down to Amen Street Fish & Raw Bar and luckily got seated right away, tousled look and all! Below are thoughts on the restaurants we did get to try- including Amen Street.  I’ve also included a recipe  from Cook’s Illustrated for an old southern favorite, pimento cheese. So, lesson learned: in a major foodie city like Charleston, make reservations!

Box Car Betty’s

FotorCreated

Yum, yum, yum the fried chicken sandwiches at Box Car Betty’s are delish! Roy ordered the Boxcar and loved it. I had the Chicken & “Not So Waffle” and relished the spicy/salty/sweet flavors. The sandwiches were served on small baking sheets and both had pimento cheese on them, hence the recipe at the end of this post! We also loved the fried pickles and the French fries. The place was once a house, and although not huge, it was cute inside. It filled up quickly and some of the patrons were cadets in uniform from the Citadel. Apparently, there is also a take out option.

Charleston Crab House Seafood Restaurant

FotorCreated (3)

We ate at Charleston Crab House on a Sunday after not being able to get into Hanks or Hominy Grill.  At that point, since we were hungry and it looked decent, we went for it. It got good reviews besides being #35 out of 656 on Trip Advisor and we found the food pretty tasty. I had a cup of the She Crab Soup and a Shrimp Po’Boy Sandwich. Roy enjoyed his Carolina Platter that had crab legs, shrimp, and a crab cake on it.  One thing the venue has going for it, is the roof top seating. Later we learned via our driver on the carriage ride we took, that back in the day, the building was once a brothel.

Amen Street Fish & Raw Bar

FotorCreated (4)

We were impressed by the fact that Amen Street Fish & Raw Bar took us in off the street without a reservation, but the fact that it was just a bit after five probably helped our cause! Our waiter was excellent; he was unhurried while explaining the menu which included a vast selection of oysters that were offered that day. We chose a couple from three different types and they arrived with crackers, lemons, and different sauces. I ordered the Charleston standard, Shrimp and Grits, and found it rich and delicious. Roy opted to have his fish “herb grilled” and he said it was great.

Pimento Cheese Recipe from Cook’s Illustrated Magazine – yields three cups

IMG_7484

Ingredients:

2/3 cup mayonnaise

1 (4 oz.) jar pimentos

1 (8 oz.) package finely shredded sharp cheddar cheese

1 (8 oz.) Package regular shredded cheddar cheese

2 tablespoons cream cheese, softened

1 teaspoon lemon juice

1 teaspoon Worcestershire sauce

14 (or less) teaspoon cayenne pepper

Procedure:

With an electric mixer, gently combine all ingredients together just until spreadable. Use as a sandwich filling or cracker spread.

So, has anyone else had a similar experience in Charleston? Does anyone have a great Charleston restaurant to recommend?

I’d love to hear about it!

Another Printable Recipe Archives     fb     tweet (2)     pin     inatagram     me


Reminiscing about Coffee in Spain


FotorCreated (82)

On the left above, is one of the several cups of coffee I had the first day I was in Spain; the photo on the right was taken just before heading to the airport to return home.

Just about a year ago, we had a great time visiting Allison in Spain. She was employed by a program that places native English speakers as teachers in secondary schools. During her week of spring vacation, Roy, Jennifer, and I met her in Madrid. We spent a couple days there, drove a rental car to Portugal, and then returned to Spain where we explored Seville, Barcelona, and finally Ibiza. A few weeks ago I woke up to the fact that I hadn’t done much sharing of our trip, so I blogged about Mannequins, Markets, and Tortilla Espanola. Here is my documentation of how I fell in love with  Cafe con Leche and some of the delicious things I ate while sipping it.

FotorCreated (79)

Roy and I flew into Madrid within minutes of when Allison landed there from Ibiza. We had agreed on where to meet ahead of time by using the map on the airport website. I was excited to see her, but also so impressed at her ability to figure out the subway system and guide us to our Airbnb apartment. After dropping off our suitcases, we explored our neighborhood and discovered a little cafe just down the street. It was there that I had my very first Spanish breakfast and cup of coffee. I followed Allison’s lead and ordered Pan Con Tomate ( bread with tomato) and a side of jamon iberico (Spain’s famous ham) just for the fun of it. Basically a DIY deal, it was up to me to slather the grated tomato onto toasted bread which had been rubbed with a little garlic. Then I sprinkled it with coarse salt and drizzled it with olive oil. If that wasn’t delicious enough, I added some of the ham on top and thought it was about the best breakfast I ever had. The cafe con leche was just the thing I needed for my jet lag. It’s made by pouring a shot of espresso into a cup and then filling the rest of it up with warm milk. The designs seen on top are achieved by pouring the milk in second with an experienced steady hand and using a toothpick to coax it into shapes such as hearts. I found coffee made this way so yummy, that I wanted to stop and have a cup of it every chance we got.

Pan con Tomate:

Toasted slices of baguette

1 clove garlic

1 tomato

Olive oil to drizzle

Coarse salt to sprinkle

Optional: Spanish ham or sausage, manchengo cheese

Slice and toast pieces of baguette. Lightly run the garlic clove over the top. Grate the tomato into a bowl, discarding the skin. Slather the tomato pulp on the toast. Drizzle with olive oil and sprinkle with coarse salt.  Nice additions are the Spanish ham or sausage and manchengo cheese; either can be found in a specialty store or Whole Foods.

FotorCreated (81)

The next day Jennifer joined us and it was her turn to deal with jet lag. A friend of Allison’s had told her about a bar in one of the Madrid neighborhoods that had great food. We took the subway over to it and found it was just a “hole in the wall”, but the food really was delicious. We munched on crusty bread, triangles of manchego cheese, and an impossibly tender meat dish that must have cooked in its perfectly spiced sauce for several hours. I attempted a similar dish in a post written soon after we returned,  Tapas Inspired Braised Meat in Port Wine Sauce . While we were eating lunch, Jennifer ordered a coffee. It was delivered to her as a shot of espresso in a glass. I was surprised, but found out later that serving coffee that way was not uncommon.

FotorCreated (80)

At the tail end of our trip, we ended up in Ibiza. It’s a legendary place for Europe’s rich and famous to frolic, but Allison worked their during the off season and never was fully exposed to how riotous it is reported to be! It seemed pretty tame while we were there, but there was no denying how absolutely breathtaking the raw beauty of the island was. For a sample of Ibiza photos, visit this post on Allison’s entertaining blog Naptime with Yasmine. One afternoon after wandering about, we stopped to watch the sunset and grabbed (of course!) a cup of coffee. We also ordered a slice of Allison’s favorite dessert, Flao. It is sort of like a cheese cake in a pie crust. The version Allison liked best was made from goat cheese and flecked with minced spearmint. Click here for a recipe I found on the web . I’m also going to post a photo of recipe I downloaded from http://www.Ibiza.Travel because I think it might be more authentic to what we sampled. Full disclosure: I have not tried making this yet, but hope to make it for Allison some day!

Flao

Now, a year after our trip, I still drink my coffee with half a cup of warm milk in it. The other half is rarely actual espresso; the majority of the time it’s just regular American coffee. Thank goodness for microwaves – right?

I’d love to hear about anyone else’s coffee traveling experiences – please feel free to comment!

Another Printable Recipe Archives     fb     tweet (2)     pin     inatagram     me


Mannequins, Markets, and Tortilla Espanola

tortilla with water mark

Ever feel like life is a roller coaster and every time is starts to slow down, it takes off again? In my case, perhaps a speeding train would be more like it. For the last year or so, I just seem to be headed to one experience after another. Throughout it all, I have enjoyed taking photos, but I haven’t taken the time to pause and do anything with them. Currently, my husband and I are living the dream (O.K. – maybe his dream!) of traveling around the United States in a motor home. Check out our travel blog at Yates RV Adventures. A couple of weeks ago, we were staying at a RV “resort” in Naples, Florida. These parks typically are a mix of prefab homes and recreational vehicles. As I was passing one of the homes, I was startled to see a mannequin guarding the door. My memory was jolted back to another mannequin I had seen when we were in Spain visiting my daughter Allison just several months ago. All of a sudden I realized I had tons of photos and lots of experiences from that trip that I had never shared or done anything with because the train I was on never slowed down. The Spanish mannequin I remembered was looking out onto the Mercado de San Miguel in Madrid. It was the first of the many fabulous markets we encountered on that trip. It had booth after booth of beautiful produce, meat, and seafood. Best of all, it had delicious ready made food that could be eaten right there or taken away for a meal at home. One dish every market in Spain had was Tortilla Espanola. This Spanish tortilla is basically a very yummy potato torte and is a common every day food in Spain. A wedge of it could be an entre, or cut in squares and served with aioli, it is often part of a tapas spread. The lady of the house where Allison was staying made it for us one night for supper and I saw how simple and easy it was to make. In this post are photos of some markets we saw on our travels. Below them is a recipe for Tortilla Espanola.

FotorCreated mannequin

The classy senorita on the left overlooks the Mercado de San Miguel. The American mannequin on the right surveys the trailer park.

DSCN2738

Above is the beautiful Mercado de San Miguel, a wonderful market in San Miguel Plaza in Madrid.

DSCN2833

This is a shot of my daughter Jennifer walking into a market in Porto, Portugal. Whether they were big or small, these places of commerce offered fresh meat and produce and we thought they were all charming.

DSCN8412

The Mercado de Ribeira in Lisbon, Portugal had the largest food court we had ever seen. The market area was in one side of the building, and the Time Out Food Hall was in the other half.

DSCN8743

Beautiful greens in the famous La Boqueria on La Rambla in Barcelona.

DSCN9086

The Mercat Nou in Ibiza, Spain sold every thing from tea and liquor made from local herbs to their famous salt and honey.

FotorCreated Ibiza Market

Of course the market in Ibiza had an offering of take away foods, including a Spanish Tortilla.

Ingredients and Procedure for Tortilla Espanola:

Tortilla

Ingredients for Spanish Tortilla:

4 medium russet potatoes, peeled and cut into 1/4 inch slices

1 medium sized onion, peeled and sliced

4 eggs

1/4 cup plus 2 tablespoons olive oil

1/4 teaspoon Spanish paprika

1/4 teaspoon salt

pinch pepper

pinch saffron (optional)


Ingredients for Garlic Lemon Sauce:

1/2 cup good quality mayonnaise

1 teaspoon lemon juice

1 clove garlic, put through press or finely minced

pinch Spanish paprika

pinch saffron (optional)


Procedure for Spanish tortilla:

In a skillet, saute the onion in 2 tablespoons olive oil until tender. Remove with a slotted spoon and set the onions aside in a mixing bowl. Add 1/4 of olive oil and the sliced potatoes to the pan. Cook, covered, over fairly low heat for 20 to 25 minutes – gently turning over once at 10 minutes. Potatoes will be done when they are easily pierced with a fork but still retain their shape. Carefully remove the potatoes from the pan with a slotted spoon and add to the onions in the bowl. Discard all but 2 tablespoons of oil from the pan. Whisk the eggs, salt, paprika, pepper, and saffron together. Pour the egg mixture over the potatoes and onions. Gently mix the to coat the potatoes and onions. Add the potato mixture to the pan and cook over low heat. As the tortilla slowly sets up, run a rubber spatula along the sides to create a rounded edge. When the tortilla is almost completely firm, remove the pan from the heat. Place a plate on top of the skillet and using pot holders or a kitchen towel to prevent being burned, flip the pan over so that the tortilla is on the plate. Then slide the tortilla off the plate and onto the skillet. Place back on low heat and cook another 3 to 5 minutes. Invert onto a serving plate and either cut into slices as a main dish or small squares as part of a tapas spread.


Procedure for Garlic Lemon Sauce

Whisk together mayonnaise, lemon juice, garlic, paprika, and saffron.


I’d love to hear anyone else’s experiences with the markets in Spain or Portugal!

Another Printable Recipe Archives     fb      tweet (2)     pin     inatagram     me