Northeast Coast Steamed Mussels

One of the best things about traveling is trying the food a region is known for. After spending the last two summers exploring the western U.S., where it’s all about beef and buffalo, this year Roy and I headed to the northeast. Above is Peggy’s Cove in Nova Scotia, Canada where fishing is still a common way of making a living. I sampled the first mussels of my trip here – they were part of a seafood chowder – and I was hooked.

Prospect, Nova Scotia where Roy’s grandma grew up is just down the road from Peggy’s Cove. Her father was a fisherman just like every other man that lived there. Today, it’s said there is only one fisherman left in the village.

Prince Edward Island, or PEI as the natives call it, is known for its blue mussels. Notice the dark colored buoys in the water? That’s a mussel farm. Baby mussels are put into a net that looks like a hanging sleeve and they happily eat and grow while being washed by the clear water. After a couple of years they are harvested. Living in their farm environment, they aren’t muddy or gritty and are very easy to cook and eat.

While in Canada, and then later in Maine and Massachusetts, we bought mussels at the grocery for two dollars and some cents a pound. Wow! Even in a motor home it was easy to cook up a mess of them. They are great as an appetizer or the main dish. The first time I made them, I used what I had on hand to add flavor to the broth. Traditionally, mussels are steamed with some white wine, but I found chicken broth was just as delicious – and I just kept making them that way! However, feel free to throw in 1/4 cup of white wine if you so desire!

Ingredients:

For every 2 pounds of mussels:

2 tablespoons butter

6 cloves garlic, finely minced or put through a press

1/2 cup chopped red onion

1/2 cup chopped fresh parsley

2 cups chicken broth (additional 1/4 cup white wine optional)

Rinse each mussel and check to make sure it is closed. If it closes up after you handle it, then it’s fine to use. But if it is cracked, open, or has an unpleasant odor, throw it out! In the several times I have made this dish, I always toss several.

If the mussel has a beard (a little string hang hanging out of the shell) gently tug it back and forth and pull it off.

Melt butter over medium low heat. Add onions and parsley and sauté until onions are just about to get tender. Add garlic and sauté 30 more seconds. Gently add mussels and carefully stir to cover them with the mixture. Turn heat up to high and pour in broth. Cover the pan and continue to cook on high for 5 minutes.

Take the cover off and give the mussels a stir. They should be open and look the the photo above. If some are still closed, put the cover back on and continue to cook on high for an additional two minutes. Throw out any mussels that are still closed after that.

Ladle the mussels and broth into serving bowls. Serve with melted butter to dip mussels in (honestly this broth is so good it isn’t needed!) and crusty bread to sop up the broth. Or serve the mussels and broth over cooked pasta. I’d love to hear if any one tries this. Feel free to email me at yatesyummies@gmail.com or make a comment below!


Save to Pinterest


It’s All About the Spice: Peruvian Food

I spent three months this winter down in southwestern Florida and while I was there, I fell in love with Peruvian food. It’s becoming increasingly more popular and restaurants that specialize in South American cuisine were plentiful. When I got home, I spent about a month trying to duplicate some of the dishes I enjoyed. Peru is thought of as the place the potato came from, and while it’s prevalent in many recipes the real star seems to be a yellow pepper called aji amarillo. It packs a lot of heat and has a distinctive taste. I had to order it in paste form online since I’ve never seen it here up north. Another interesting thing about Peruvian cooking is the strong Asian influence from Chinese immigrants that is evident in many of the dishes. Lomo Saltado, show in the bottom left of the photo above, is essentially a stir fry – complete with soy sauce – served on top of French fries. It is super easy to make; check out my post on YatesYummies to get the recipe.  The two recipes in this post are a little more involved. For the hearty Chupe De Camarones, I offer some substitutions that can be used if you don’t want to try to track down hard to find ingredients. But in the so, so delicious huacatay salsa, only hucatay – black mint – can be used. I had a lot of fun investigating these recipes and I hope if you attempt them you’ll enjoy the process too! Let me know how it goes!


Chupe De Camarones – Peruvian Shrimp Chowder –  Serves Four


Some Lessons Learned:

  1.  To make traditional chupe de camarones, shrimp broth made from simmering the shells in water is needed. During the several times I made this recipe while trying to perfect it, I couldn’t always find fresh shrimp still in their shells. So, I tried using bottled clam juice, and I didn’t notice too much difference. It was also a time saver!
  2. To get the spicy authentic flavor I needed, I realized I had use the real deal. So I ordered aji panca chili, aji panca chili, and huacatay pastes from Amazon.com. These seemed to be the “holy trinity” in so many Peruvian dishes.
  3. In search of flavor, I tried using annatto oil to saute the onion for the chupe de camarones. I really didn’t discern any large taste boost, but I did notice the rosy glow it gave the dish.
  4. In the soup, using frozen vegetables worked just as well as fresh.
  5. I learned that at high heat, milk curdles but heavy cream doesn’t. Plus, it gave me that silky mouth feel I was looking for.
  6. I wasn’t always successful at keeping the poached egg together. If it breaks apart, no worries! The soup still tastes great!


Ingredients:

1 lb uncooked shrimp in shells (or use precooked frozen shrimp)

4 cups water (or 16 oz. clam broth and 2 cups water if shrimp shells are not available)

2 tablespoons olive oil

1 tablespoon annatto seeds (optional)

1/2 cup finely diced red onion

2 cloves garlic, put through a press

1 teaspoon ground zapote (or 1 teaspoon oregano)

1 teaspoon aji amarillo chili paste (or 1 tablespoon finely diced jalapeno)

1 tablespoon aji panca chili paste (or 1 tablespoon tomato paste)

pinch ancho chili powder (optional)

1/2 cup frozen corn

1/2 cup frozen peas

1/2 cup frozen green beans

1/4 cup long-grain white rice

1 medium white potato, peeled and cut into 1 inch cubes

1/2 cup heavy cream

1/2 cup cubed queso fresco

4 eggs

4 tablespoons chopped cilantro leaves for garnish

Directions:

If you are lucky enough to have access to fresh, raw shrimp still in their shells – peel them. Set the uncooked shrimp aside in the refrigerator and rinse the skins. Place the skins in a pan with four cups of water. Bring the water to a boil and then turn down the heat and let the mixture simmer for about 20 minutes. (Skip this step if shells are not available and you are using clam juice.)

While the shrimp shells are simmering, heat olive oil over medium heat in soup pot. When the oil shimmers, add the annatto seeds. Let them simmer for 5 minutes, then strain the oil to remove seeds and return it to the pan. Keeping the heat at medium, add the red onion and saute until soft – about 5 minutes. Add the minced garlic, aji amarillo chili paste, aji panca chili paste, zapote, and ancho chili powder and saute an additional 30 seconds.

Strain the shrimp mixture and discard the shells. Add water to the broth so the entire amount is four cups. Pour into the soup pot (or clam broth and water if that is what you are using) and add the corn, peas, beans, and rice. Bring to a boil and then turn the heat down to medium and allow to simmer for 10 minutes.

Add the potatoes, bring the heat up to a boil again, then turn the heat down and simmer about 10 minutes more or until the potatoes and rice are tender.

Add shrimp and simmer about 5 minutes or until they are totally pink and cooked through.

Stir in the cream and queso fresco. If needed, turn up the heat so that the mixture is very hot. One at a time, crack the eggs in a small bowl and add them to the soup. Cook three more minutes.

Divide the soup between four large bowls, getting an egg in each one. Sprinkle each serving with one tablespoon of cilantro leaves to garnish.


Huacatay Salsa

Ingredients:

2 tablespoons huacatay paste

2 tablespoons aji amarillo

2 tablespoons olive oil

2 tablespoon diced onion

2 cloves garlic, put through a press

1/2 cup mayonnaise

1/4 cup roughly chopped cilantro leaves


Directions:

Put everything in a food processor and blend until well combined. This is great on vegetables and meats as well as served as a salsa with sliced bread or chips.


BBQ Guys Don’t Go Anywhere Without Their Knives and Other Tips for Barbecuing

In the introduction to the epic book Peace, Love, and Barbecue, food critic Jeffrey Steingarten shares this advice, “Tips, we learn, are so much more important than recipes…”  After taking a six hour class from BBQ champion Dana “Big Papa” Hillis of Naples, Florida – I realized that is exactly what my takeaways were. Yes, there are some recipes posted down below, but actually they are more like methods and procedures – with a lot of wiggle room.  Barbecuing via smokers is a process and everyone puts their own spin on it.  So enjoy these recipes and tips that were shared with me, and please comment below on how you do it!  *Spoiler alert – Hillis’ approach is all about BBQ competitions, or in other words, winning a judge over at first bite; he uses a lot of butter and sugar!

Hillis brought some of his BBQ buddies to help out with the class. The guy in the top right is the pit master at The Wood Pile BBQ Shack in Clawson, Michigan. Below are the legendary Wolfe brothers from Orlando, Florida. Here is some of the wisdom they imparted:

“BBQ guys don’t go anywhere without their knives.”

“Learn your cooker, learn your hot-spots.”

“Each time you barbecue, write down what you do, then if you ‘hit it’ right, you’ve got it down on paper.”

“Use apple juice in spray bottle to keep meat moist while cooking.”

“If you are serious about BBQ, you need an internal probe to measure temperature –  internal temperature is the most important thing to know to tell if meat is done, especially steaks.”

Serving amounts needed:

1 meat – 6 oz. per person.

2 meats – 5 oz. per person

3 meats – 4 oz. per person

“Clean grill while it is still warm” – use scraper or wad of aluminum foil.

“Hollywood Cut  is a trick from the barbecue competition circuit, they discard every other bone so each remaining bone has double the meat and even pile loose meat in between ribs.”


Procedure for Smoker Ribs

Types of Ribs:

Country Style Beef Ribs

Baby backs

Spare Ribs

St. Louis Cut Ribs

Choose your preference

Pull skin off back so rub gets in – “When you take a bite you get a taste of the bottom of the rib as well as the top.”

Use piece of paper towel –  some people use pliers.

However, sometimes the skin is already off.

Use the 3 – 2 – 1 Method.

Usually, this means 3 hours of smoking,unwrapped at 225 degrees, followed by 2 hours of cooking wrapped in foil (with a little liquid, such as apple cider), followed by 1 hour of cooking unwrapped at a higher temperature, with a generous basting of barbecue sauce.

But – this is the way Hillis does it:

Indirect heat for about 3 hours –  between 230 degrees and 240 degrees.  Hillis feels like 234 degrees is the optimal temperature and usually for him, this three hour part is more like 2 1/2 hours. “When you start seeing bones pull back, they are ready to be pulled off.”  Then he slathers the meat side with butter or margarine, honey, and brown sugar. He wraps the ribs in foil, meat side down, and puts them back in the smoker. By the way, Hillis says all honey is not alike, “Clover honey is bland and o.k. for sauces, but orange blossom type honey seems to overpower the sauce flavor.” After a couple hours, take the ribs out, unwrap and let the internal temperature cool down to 140 degrees. Then wrap the ribs back up again and let them sit for an hour before serving.


Wings

Ingredients:

1 (10 pound) bag jumbo chicken wings

16 oz. Italian Dressing -“Vinegar opens pores – definitely better if they are marinated”

1 cup BBQ rub

Put all ingredients in a zip lock bag(s) and marinade overnight.

Cook at 350 degrees indirect heat, turning them over once after 45 minutes and cook until they get to 195 internal temperature.

Hillis’s sauce for wings is Franks hot sauce mixed with honey and brown sugar – a departure from the usual Franks & butter.


Clean out the Refrigerator Stuffed Pork Loin

Trim the fat off of the pork loin, leaving about 1/2″ of fat on.  Filet it by slicing it open lengthwise being careful not to cut all the way through, so it opens up butterfly fashion.

Sprinkle w/rub – a generous amount – on both sides

On one side,  layer any or all of below:

Spinach

Mushrooms

Provolone cheese

Onions

Red bell peppers

Salami

Prosciutto

Sun dried tomatoes

Salepenos

Season, close it, and tie it with butcher string using a mattress stitch – insert needle on side where just exited, then take to other side and insert again on that side, taking it to other side and repeat.  Sprinkle with more rub.

Cook fat side down in 300 degrees indirect heat for 1 1/2 to 2 hours.

Let internal temperature get to between 130 to 140 degrees. Hillis says 135 best, but don’t let it go past 145.


Eight Minute Grilled Rib Eye Steak

Meat is graded as prime, choice, or select.

Hillis uses choice and cuts the steaks 1″ thick.

Give the steaks a “salt bath” – salt very heavy with coarse sea salt, leave on for 15 minutes, then wash the salt off. This opens the pores of the meat and allows seasoning in.

Spray grate with Pam spray.

Heat grill up as high as it can go, cook 2 minutes, turn 90 degrees and cook 2 minutes, flip over and cook 2 minutes, turn 90 degrees and cook 2 more minutes. (Close the lid each time you turn or flip the steak.)

Each time you turn or flip steak, move to the other side of the grill, quickly “cleaning” the now empty part of the grate with balled up aluminum foil, before closing lid. This ensures those really nice cross hatch grill marks.

If you wish to grill a 1 inch pork chops, Hillis  sprinkles them with with McCormick Brown Sugar Bourbon Grill Mates Seasoning and Montreal Steak Seasoning, then uses this method to cook to internal temperature of 135 – pink in the middle.


Smoked Beef Brisket

When buying a brisket, look for piece of meat with lots of white streaks.

Cut fat off to ¼ inch on bottom.

Put rub on, and let sit in refrigerator for a few hours.

Rub:

3 parts ground black pepper

3 parts diamond crystal salt

1 part garlic powder

Then, place in smoker -fat side down at 230 degrees. Leave it in there until the internal temperature reaches 170. This could take up to 9 hours. There is a period, called the “stall”, where the temperature seems to hover somewhere between 145 and 160 degrees. Just be patient, keep the temperature constant, and wait.

Once it reaches 170 (a lot of websites say 165) take it out – it will look almost black on the outside – spray it with a bit of apple juice and double wrap it in butcher paper.

Place it back in the smoker at 275 (again – a lot of websites have a different take – like temperature still at 230 degrees) and allow the internal temperature to come up to 198 degrees.

Then take it out. The temperature will raise up 10 degrees after you pull it out of the smoker. Let it rest for an hour and allow the temperature comes down to 202 degrees. Then hold it until ready to serve by keeping it in the butcher paper, wrapping it in a towel and placing it in a cooler. (Restaurants usually bring the temperature down to 170 degrees and then hold it in a warming oven or hot box.)

Bottom line – the above is a suggested procedure – make it your own and keep data on your trials.


Sides

Stuffed Peppers

Use the sweet small “snacking” peppers and/or jalapeños.

While wearing gloves, cut in half, leaving stem on, and scoop out seeds and membranes.

Place the peppers in a foil pan, place in indirect heat, and allow them to cook until softened.

Then mix together:

2 (8 oz.) packages cream cheese

1 pound sausage – browned and oil drained off

A bit of BBQ rub seasoning


Stuff each pepper with the cream cheese mixture and sprinkle shredded cheddar cheese on top.

Return to the indirect heat and cook until cheese is melted and bubbly.


Tater Tot Bombs

Ingredients:

Tater tots

bacon – cut each slice into thirds

american cheese – cut each slice into thirds


Wrap each tot with a piece of cheese, then a piece of bacon, and secure with tooth pick.

Place each tot in foil pan.

Cover with brown sugar.

Cook 250 or above, until bacon gets crispy.

Drizzle with BBQ sauce before serving.


Grilled Veggies

“Vegetarian is an old Native American term for ‘Poor Hunter’ ”

In a foil pan, place slower cooking vegetables on bottom and top, faster cooking in the middle.

Use any or all of the following:

Green beans

Eggplant

Tomato

Onion

Corn

Potato

Yellow squash

Add butter through out.


Cook about 3 hours at 300 degrees.


Baked Corn

Ingredients:

1 package Jiffy Corn Bread Mix

1 (15 oz.) can creamed corn

1 (15 oz.) can regular corn, drained

1 stick butter, melted

1 cup sour cream

1/2 teaspoon salt

1/4 teaspoon pepper


Mix all ingredients together and place in foil pan.

In regular oven bake 350 degrees for 45 minutes

In smoker  – done when firm


Dessert

Use Dutch baker pots (can buy liners – otherwise cleanup is so hard) or use foil pans in indirect heat.


Cherry Dump Cake

Ingredients:

1 can cherry pie filling

1 can crushed pineapple

1 package white cake mix

1 stick melted butter


Dump pie filling and pineapple in pot. Sprinkle cake mix on top and drizzle melted butter on top.

Bake 350 degrees for 45 minutes in oven or in dutch oven with coals on bottom, coals on top.


Peach Cobbler

Ingredients:

1 stick butter, melted

1 cup sugar

1 cup self-rising flour

1 cup buttermilk

1 (29 oz.)  can peaches ( or any canned or fresh fruit)


Put the melted butter in the bottom of a pan.

In a bowl, mix together sugar, self-rising flour and butter milk.  Put the flour mixture on top of melted butter.

Then put canned peaches on top with a little bit of the juice.

The “crust” will rise to the top as it cooks.

Bake 350 degrees for 45 minutes in oven or in dutch oven with coals on bottom, coals on top.


San Francisco Salmon Salad

As part of our three and a half month motor home trip this summer, Roy and I took about four weeks to travel the western side of California from top to bottom. We loved it all -from the giant redwood trees to the southern beaches- but found San Francisco an especially fun experience. We actually stayed about an hour north, in Santa Rosa and used the Jeep we tow to explore the area. On the first full day, we went to Muir Woods and then decided to drive across the Golden Gate Bridge.  After the trill of arriving on the other side, we just kept on going. We ended up on the corner of Franklin and Oak where we saw a paid parking lot. We definitely weren’t in the touristy part; some of the buildings didn’t look too well kept, but there were plenty of people walking around and lots of cute looking restaurants. The parking lot attendant told us we had until 7 pm – that’s when he left – and he warned us that if he wasn’t around, when we returned to the car, the bikes we had attached to the back wouldn’t be around either. So we ducked into a place called RT Rotisserie, thinking it would be quick and easy enough to grab a bite to eat. It turned out the place was a spin off of another, fancier eatery called Rich Table – the kind of establishment where one must have a reservation. We lucked out because Roy had an absolutely delicious pork sandwich and I had one of the best salads of my life – and we made it back to the car on time!  I began duplicating the salad again and again; it’s lemony, crunchy and filled with colorful greens and herbs. RT Rotisserie only serves pork and chicken but topping this salad with a piece of salmon baked with a smear of the salad dressing makes it a meal. I hope you enjoy it as much as I do. If you would like a printable recipe, click on the recipe archive button at the bottom of the post.

Ingredients and Directions for Four Servings:

Suggestions for the greens:

5 oz. spring mix

5 oz. spinach leaves

1 cup washed,torn radicchio leaves

1/4 cup fresh dill, roughly chopped

1/4 cup fresh flat leaf parsley, roughly chopped

1/4 cup fresh mint roughly chopped

1 cucumber, sliced


Place all ingredients in a large bowl.


Suggestions for the crunch:

1/4 cup raw pepitas

1/4 cup raw sunflower seeds

2 tablespoons sesame seeds

2 tablespoons  black sesame seeds

12 radishes, washed and sliced


Set aside the crunchy things until time to assemble the salad.


Quick “pickled” red onion:

1 red onion

1 cup vinegar

1 cup water

1 teaspoon kosher salt

1 teaspoon sugar


Mix the vinegar, water, salt, and sugar together. Peel and thinly slice the onion. Pour vinegar mixture over the onion slices and let sit for at least 10 minutes. Set aside until time to assemble the salad.


For the dressing:

3/4 cup olive oil

1/4 cup plus 2 tablespoons fresh lemon juice

2 cloves garlic, finely minced or put through a press

2 tablespoons tahini (sesame paste)

1 teaspoon soy sauce (regular, low sodium, Tamari, or Maggi – your choice)

1/2 teaspoon kosher salt

1/4 teaspoon pepper


Whisk all ingredients together in a bowl. Place 1/2 cup of dressing in a separate container to brush on the salmon. Set the rest aside for the salad.


For the Salmon:

4 salmon fillets, each about 4 to 6 oz.

1/2 cup of lemon tahini dressing from above recipe

2 teaspoons  sesame seeds

2 teaspoons black sesame seeds

2 teaspoons dried dill

1/2 teaspoon salt

1/4 teaspoon pepper


Mix sesame seeds, dill, salt, and pepper together in a small bowl. Liberally brush the salmon fillets with the dressing to coat well. Discard any unused dressing that has come into contact with the brush. Sprinkle the seed mixture evenly over the salmon. Bake 15 to 20 minutes until fish flakes up with a fork and looks a solid, lighter pink – not a gelatinous red.


When the salmon is done, toss the greens with enough dressing to coat well. Divide the dressed salad onto four serving plates or one huge platter. Place drained pickled red onions, sliced radishes and seeds on top of the greens. Nestle the salmon fillets on top the salad and dig in.


Save To Pinterest

Big Plate Super Salad

Summer is the time for salads and with all the options of fresh seasonal vegetables at hand, the combinations are endless. But – what’s the secret to building one that satisfies me until dinner instead of feeling like snacking at 3 pm? I think the answer is a combination of textures, flavors, protein and a tiny bit of fat. If each ingredient is seasoned enough to stand on its own, then every bite is an explosion of deliciousness.

This post is sort of blueprint for a salad that satiates. I love spinach, hard boiled eggs and red wine vinegrette together. Of course any item can be switched out to whatever is at hand or individual tastes; just make sure to use a nice big plate!

Steps to a Big Plate Super Salad

The Base:

Greens- about two cups – pick just one variety such as spinach as I did here or mix it up with a combination of several.

Dressing – to drizzle on the greens – choose the vinaigrette I used or go for a flavored oil with an acid such as lemon or any kind of vinegar.

Simple Red Wine Vinaigrette:

1/2 cup olive oil

1/4 red wine vinegar

1 clove garlic clove, minced or put through a press

1/2 teaspoon oregano

1/2 teaspoon  kosher salt

1/4 teaspoon black pepper

Whisk all ingredients together.

Layer of Density:

Roasted or grilled vegetables – try broccoli, cauliflower, even cherry tomatoes. It’s easy to oven roast any veggie at 350 degrees for about 50 minutes but here I used eggplant and zucchini cooked on the grill to acquire a wonderful smokiness.

Grill Roasted Eggplant and Zucchini

1 medium sized eggplant

1 medium sized zucchini

2 tablespoons olive oil

1 teaspoon kosher salt

1/2 teaspoon thyme

1/4 teaspoon marjoram

1/4 teaspoon garlic powder

1/4 teaspoon black pepper

Wash off and dry the eggplant and zucchini. Cut off the ends and slice into 1/2 inch rounds.

Place cut vegetables on a large sheet of heavy duty aluminum foil. Crimp up the edges. Drizzle the olive oil over the vegetables.

Put salt, thyme, marjoram, garlic, and pepper in a small bowl and whisk together.  Sprinkle over the vegetables and with clean hands, gently toss to distribute seasoning.

Heat up grill to medium high heat and place the vegetables on their foil sheet on the grids. Close the grill cover and cook for 20 minutes, turning the vegetables over at the 10 minute mark.

Allow to cool before placing on top of salad greens.

Flavor Punch:

A legume spread – I used 1/4 cup hummus here, but any rinsed and drained bean such as black or great northern beans could be processed into something yummy.

Hummus from True Food by Andrew Weil, MD:

2 (15 oz.) cans garbanzo beans, rinsed and drained

1 large garlic clove, put through a press

1 small jalapeno chile, seeded and diced

2 tablespoons plus 1 1/2 teaspoons tahini

1/4 cup lemon juice

juice of 1 lime

1/4 cup chopped fresh cilantro

1 1/2 teaspoons ground cumin

pinch of cayenne pepper

1/2 teaspoon salt

Combine the beans, garlic, jalapeno, chili, tahini, lemon juice, lime juice, agave nectar, cilantro, cumin, cayenne, and salt in a food processor and blend well. Slowly pour in the olive oil as the mixture is processing until the mixture is smooth. Transfer to a bowl and refrigerate until ready to serve.

A little something extra – pour a little good olive oil over the hummus and then sprinkle with Aleppo pepper.

A Delicious Swoosh:

A great sauce – 1/4 cup of savory yogurt- optimizes the chance that a salad will satisfy. People with a dairy intolerance could substitute something wonderful like the jarred artichoke red pepper bruscetta that at Trader Joe’s.

Savory Yogurt Sauce- yields 1/2 cup

1/2 cup Greek yogurt

1 tablespoon olive oil

1 tablespoon lemon juice

1/2 teaspoon za’tar

1/4 teaspoon kosher salt

Dash or two turmeric powder

Blend all ingredients except turmeric in small bowl.  After spooning on serving platter, sprinkle a dusting of turmeric powder on top.

Important Ingredient:

Protein – any choice – keeps hunger away. I love the combination of spinach, eggs, and red wine vinegar but shredded chicken, beef, or pork would work as well. Shrimp would be amazing too.

Hard Boiled Eggs

Gently place large eggs in a pan of enough cool water to cover them. Place on burner set to high and immediately set timer for 20 minutes. When the timer goes off, run cook water over the eggs. Peel when the eggs have cooled down enough to touch.

The Finale:

Pickled vegetables – The cheating way- are so quick and easy to make. Since they crown the salad plate and are the last layer to be put on, they have plenty of time to soak up tangy vinegar.

Pickled Vegetable Cheat

1 cup sliced vegetables such as cucumber, beet, carrots, bell pepper, red onion, etc.

1/2 cup vinegar, plain or any kind

1/2 teaspoon salt (optional)

1/2 teaspoon sugar (optional)

Place vegetables in a small bowl. If using, mix the salt and sugar into the vinegar. Pour the vinegar over the vegetables and allow to sit at least five minutes before using.


So I’m curious- what other great combinations are there out there? Please tell – I’d love to try them!


Day After the Wedding Brunch

Photo courtesy of JennaStoller.com

A couple of weeks ago my daughter Caroline was a beautiful bride. The wedding weekend was a whirlwind of gatherings and activities. One of the events that I enjoyed planning for the most, was the day after the wedding brunch held at our house. Since the groom’s family was from out of town, Caroline requested that we offered them one last chance to get together before they traveled home. Everyone had a chuckle or two as they rehashed the events of the weekend; there were a few shenanigans that will be remembered for a long time!

In planning for the brunch, I knew that by the time it rolled around I would be exhausted. Leading up to it was a BBQ on Thursday night for groomsman who were staying with us as well as other people who were in town, a 9:00 rehearsal Friday morning (another wedding was going on at the venue that night so we couldn’t rehearsal then) followed by a bridesmaid luncheon, the Friday night rehearsal dinner, and then the wedding day with all the flurry of getting ready and a long night of celebrating.  So although I love to cook, I realized I was going to have to order food to be brought in.  I had attended two events at Table, a restaurant that is part of a glorified grocery store, Market District, and thought the food was delicious and reasonable. However, they offered what I really wanted: home delivery.  They have several locations in the United States – here is a link to their catering menu. The menu says “Pick Up Menu” but they do indeed deliver!

Ten days before all the crazy wedding madness began, I gathered all the containers and serving pieces I figured I would need for what I ordered. I set them aside on the floor of the dining room and no one wandered in there to notice them.  A week before, I shopped for the non-carry in items such as the granola, yogurt, and paper goods.

The morning of the eleven o’clock brunch, I put the serving pieces on the table and Beth Ann from Market District in Carmel arrived about 10:30 am. She kindly helped me set up the spread and then sped off before the guests arrived. I was going for an elegant shabby chic vibe, and I think I achieved it. Snagging five of the wedding flower arrangements from the night before definitely made it look pretty.

Unfortunately, I only took a very few photos before the guests arrived. But hopefully this small documentation of my experience might help another harried mother of the bride!

Here is what was on the menu:

Orange Juice and Mimosas

I put out a couple of carafes of OJ which I refilled several time during the brunch. (The refrigerator was just a few steps away and I had bought a couple gallon containers of orange juice.) Perhaps it would have been nice to have an alternative juice like cranberry, but I was going for ease while hostessing.  For people who wanted a bit of the hair of the dog that bit them the night before, I offered a chilled bottle of bubbly for mimosas. I had another bottle tucked away in the refrigerator as well. I used pint sized Ball jars for glasses and I found the striped straws at Party City

Tea and Coffee

A couple of weeks before, I retrieved my mom’s silver coffee & tea service that had been tucked away in a cabinet for decades. The pieces were literally as black as the label on the twine tied tag that said “coffee”. I used Wright’s Silver Cream Polish and the tarnish didn’t budge hardly at all. Tarn-X Tarnish Remover saved the day, although I used the Wright’s immediately after it to remove a yellowish cast that was remaining.  I had Market District bring boxes of regular and decafe coffee and pored the regular into the silver urn while putting the decafe in another container off to the side. Everyone wanted regular however and I ended up having to brew more. I put hot water in the tea pot and put out assorted teas but what people really went after was the regular coffee.


Orzo Salad, Lots of Berries and Pastries

The Market District’s orzo salad with artichoke hearts and feta among other ingredients was so, so delicious. For my copy cat recipe of their Mediterranean Orzo Salad, click here. They also brought the pastries and all the beautiful, washed berries. I covered the main table with a roll of brown paper and then put everything in my own serving pieces.

DIY Yogurt Parfaits

I poured Quaker Oats granola as well as spooned honey and cherry chocolate yogurt into large jars. I parked them close by to the fruit and placed a tin tub with 1/2 pint ball jars on the table. My Walmart purchased brown cardboard labels tied with twine around the tub made the suggestion to use the jars to hold yogurt parfaits. But – most people didn’t use the jars!

Toast Bar

Far and away the hit of the day was the toast bar. I plugged in a toaster, put artisan french and whole grain bread in a basket, and provided lots of spreads. Guests came back two or three times to toast their bread and slather it with either avocado mash, hummus, feta cheese, cherry tomatoes, good olive oil, and even a honey comb. There was also peanut butter, regular butter, hot pepper flakes, lemon slices for squeezing, and sea salt. (The hummus was store bought, but if you’d like a really great hummus recipe, you’ll find it in a post link here.)

Breakfast Pizzas and Caprese Salad

Rounding it all out was a caprese salad and three different kinds of breakfast pizza all from Market District. All of the pizzas had scrambled eggs on top which sounds weird but it turned out to be really scrumptious. My favorite was one with sun fried tomatoes, basil, and feta but most people loved the one with sausage gravy as the pizza sauce. A third one with mushrooms, roasted peppers, and onions was also delicious.

After it was all over, we just melted into the couch and rehashed the whole weekend. I was glad I did the brunch; it brought a sense of closure to a year of planning and the actual big event!


Fancy Doughnuts in a Plain World: “Amish Crack”

When Allison came home after spending a day in Northern Indiana doing research for an article she is writing about the Amish community and the RV industry, she told me she had sampled the best doughnut of her life. She said the locals call them “Amish Crack” because they are so delicious and addictive. I’m not a baker; most of my cooking involves dishes that are tasty – but fast! (Visit the Yates Yummies blog) Roy always laughs and says everything I make takes 15 minutes tops, so I’m not geared to the patient process of waiting for dough to rise. Plus I lack a basic understanding of the chemistry aspect of baking. However, after Allison found a post on Finding Harmony Blog that documented the author’s attempts at duplicating Rise’n Roll Bakery’s Cinnamon Caramel Doughnut, I had a desire to join in on the search for a recipe. What a wild ride! After several attempts I managed to cover every surface of my kitchen with a thin layer of flour and/or confectioners sugar and had some spectacular failures (think rock hard or envision a tire deflating).   I’ve documented what I learned below, along with the recipe I finally settled on. If anyone out there tries it, I would love to hear feedback! Likewise, if there is a better recipe for these delicious morsels, please share! To print out the recipe, scroll down to the bottom of this post and click on the “button”.

Just a quick aside – above and below are photos I took in 2015 while visiting Amish Acres in Nappanee , an attraction/museum dedicated to preserving historic buildings of the early Amish settlers in Indiana.

We spent three days in Nappanee while our motor home was being serviced at the Newmar Corporation. We were able to take a factory tour and experienced a bit of cognitive dissonance watching hustling Amish workers string yards and yards of electrical wires onto the RVs being built.

We also traveled to Shipshewana (above left, and right) and LaGrange (above lower photo right). Except for the slow moving vehicle sign in the back, seeing the horse and buggies is like going back in time.

The Amish try to keep their old ways while living in the modern world…

But let’s talk about the legendary doughnuts.

The Dough:

In the comments on the Finding Harmony Blog post, several people stated that they felt like potato was the secret ingredient needed to make the fluffy doughnuts. First I tried yeast-less potato dough, then potato dough with yeast. I also gleaned ideas from this recipe for Amish Doughnuts.

Here is what I learned:

  1. Resist the temptation to use a food processor to mix potato dough. The less handling the better or else the doughnuts will be dense, not fluffy. I realized that if I let the potato “melt” into the yeast water and then added it to the flour mixture, I could combine all the dough ingredients together with a fork.
  2. Grease the parchment paper that cut-out doughnuts are laid to rise on, or else they stick like crazy.
  3. Too long a second rise time made the doughnuts puff up so much the hole closed and when I tried to move them off the paper, they deflated. I fried a couple anyway and now I know why doughnuts need a hole; the middle stays raw when the outside is done.

The Caramel Glaze:

The Finding Harmony Blog post included two possible caramel glaze recipes; one used brown sugar and the other white sugar from the cook book Homemade Doughnuts: Techniques and Recipes for Making Sublime Doughnuts in Your Home Kitchen by Kamal Grant (Quarry Books, 2014). The white sugar recipe was tricky since it involved heating the sugar to caramelize it, but the flavor was truly superior.

Here is what I learned:

  1. The white sugar turns to burnt sugar very quickly once it starts to change color. Err on the side of caution and pull it off the heat sooner than later. It is tricky.
  2. When caramelizing the sugar it will turn into a hard ball when other ingredients are added to it. After searching for information on how to correct it, I found a What’s Cooking America post that advised adding a drop of lemon juice to prevent the problem.
  3. However, while the drop of lemon juice improved the situation, it didn’t entirely prevent all of the water/sugar mixture from hardening up on my stirring spoon and in the bottom of the pan. I found that heating the cream up in the microwave for 20 seconds so that it was warm, but not curdled, helped a lot.

So here’s the recipe that resulted from all my experimentation:

Amish Crack Doughnuts – Yields About 2 Dozen Doughnuts

Ingredients

For Dough:

1 (around 10 oz.) potato

4 cups water

4 cups all-purpose flour

2 cups self-rising flour

1/2 cup sugar

1 tablespoon salt

3 eggs

1/2 cup shortening (such as 1/2 of a Crisco Baking Stick)

2 packages yeast

Large bottle of vegetable oil (about 24 oz.)

Extra self-rising flour for rolling out dough

Ingredients for Caramel Glaze:

1/4 cup granulated sugar

2 tablespoons water

1 drop lemon juice

3/4 cup of butter

1/4 cup heavy cream

1 teaspoon table salt

1 teaspoon vanilla

1 cup confectioner’s sugar

Ingredients for Cinnamon Powdered Sugar

2/3 cup confectioner’s sugar

1 tablespoon cinnamon

Directions for Doughnuts:

Add the Peel and cube potato. Place in sauce pan with 4 cups water. Bring to a boil, reduce heat to medium, and cook for 15 minutes or until tender. Drain the potatoes and reserve the cooking water.

While the potato is cooking combine the all-purpose flour, self-rising flour, sugar and salt in a large bowl.

When it has cooled down to a warm but not hot temperature, place two cups of the potato cooking water in a medium sized bowl and pour the yeast over the top of it. Let it sit for 5 to 10 minutes until it looks smooth but foamy. Give it a stir.

Use a ricer or push the cooked potato through the holes of a colander. Don’t worry if the potato just ends up being mashed. Add the riced or mashed potato to the yeast water and give it a stir. The potato will sort of dissolve and disintegrate into the water.

Melt the shortening and allow to cool slightly. Whisk the eggs together.  Add the melted shortening, whisked eggs, and yeast/potato water to the flour mixture and store with a fork until it is combined. Don’t knead.

Grease the inside of a very large bowl with shortening or butter. Place the dough in the middle and cover with a tea towel. Allow to rise until double. This can take a couple hours, depending on how warm the room temperature is.

After the rising period, punch the dough down and place on a self-rising flour covered surface or pastry cloth. Knead just a couple times, then roll out to a 1/2 inch thickness. Using either a doughnut cutter or a glass turned upside down that is about 3 1/2 inches in diameter, cut out doughnuts. (If using a glass, cut holes out of the middle with an empty spice bottle or something similar.) Place the doughnuts on a baking sheet that has been covered with well greased foil or parchment paper. Cover with tea towels and let rest/rise for 1/2 hour.

Pour the vegetable oil in a large sauce pan. Heat to between 360 and 375 degrees. If working without a candy/cooking thermometer, the oil will be ready when it shimmers and a doughnut hole is surrounded by simmering bubbles when dropped in.

Fry 3 to 4 doughnuts at a time, about 2 minutes on each side. They will be lightly browned. Place cooked doughnuts on cooling racks which are on top of paper towels.

While the doughnuts are still warm, dip them into the Caramel Glaze (recipe below). Finish them off by placing the Cinnamon Confectioner’s Sugar (recipe below) in a fine mesh strainer and giving each doughnut a dusting.

Directions for Caramel Glaze

Cut the butter up into small cubes and set aside. Place the sugar and water in a small sauce pan. Stir to combine then place over medium heat and allow to simmer/boil without stirring for around 7 to 10 minutes until the mixture browns but doesn’t pass to the burning point. Do not walk away from the stove! It takes a while to get it going, but once it gets to a golden brown color, it quickly goes to burning. Once it is golden brown, remove the pan from the heat. Heat the cream in the microwave for 20 seconds so that it is warm, but doesn’t boil or curdle. Whisk the warm cream, a little at a time, into the sugar syrup. Add the butter, a little at a time, while continuing to whisk. Whisk in the confectioner’s sugar, salt, and vanilla until the mixture is smooth.

Direction for Cinnamon Confectioner’s Sugar

Place the confectioner’s sugar and cinnamon in a small bowl and stir until blended together.


An American’s Observations of Some Charming Cafes in Australia and New Zealand

cafe-pic

As an American “mum” visiting two of my daughters in Australia and then traveling on to New Zealand, I was prepared to see lots of beauty. However, I couldn’t help but be awed by the cafe culture. What I expected was an abundance of places that served tea to middle aged ladies wearing hats. Those existed too, but what actually seemed to be more plentiful were establishments that not only served coffee (and tea) but also innovative food. I shouldn’t have been so surprised since my daughter Allison had written an article about Navigating Australian Coffee Culture as well as posted some fabulous photos featuring Melbourne cafe culture on her  entertaining blog Naptime with Yasmine. There is no substitute for real experience though, and I came away with a few observations as well as a craving for a bliss (protein) balls. Those little morsels were seen nestled among the sweet offerings in several cafes. A recipe for Almond Butter Bliss Balls is given below; they are not too sweet but still delicious, and ingredient proportions can be played around with to suit individual tastes.

First of all, I was blown away but the sheer number of cafes.

street-cafes

Each of the smaller bergs we passed through in our rented car had a least one really cute cafe. In bigger cities, there seemed to be multiple coffee shops literally side by side. In contrast to the U.S., each tiny shop had its own unique individuality and style. Some major themes seemed to emerge – “shabby chic”. “retro ’50’s” or “Euro new age”. Turquoise seemed to be a favored color, but another prominent decor scheme was white paired with gleaming stainless steel adorned with potted succulents.

coffee-cups

I LOVED the coffee cups. Probably the correct term for them is cappuccino cups. What ever they are called, I ordered a set of colorful ones from Amazon when I got home. Of course, I had to have one in turquoise.

img_2814

They serve lattes in a glass.  Does anyone know why?

At one point I just ordered a regular coffee. The waitress looked confused.

“Mom, you can’t do that here”, my daughter Jennifer explained.

What? It turns out that each coffee is built from espresso. An “American” cup of coffee would have to be made by adding a lot of hot water to an espresso shot. In addition to that, since each order is individually made, be prepared for a long wait in line if the cafe has only one barista working one machine.

img_3258

So, what goes with a cup of coffee? If it was ten in the morning or mid afternoon, I’d go for a sweet. Bar cookies or sheet cakes are called “slices”.  Often seen with fruit filling and crumble topping, they were absolutely over the top tasty! But so was everything else, even the “biscuits” (cookies to Americans).

savory-cafe

If it was breakfast or lunchtime, the savory food served in the cafes was scrumptious. Even a small town cafe could be counted on to offer fresh, high quality dishes. No bagels or fried food were in sight. Always on hand were carafes of water and a supply of small glasses that patrons could help themselves to.

The following photos show just a few of the cafes we encountered.

img_2926

Sonido! South American Cafe  69 Gertrude St, Fitzro, Melbourne

Very close to the Melbourne Museum.  Make sure to get there before the kitchen closes at 3 pm.

img_3000

Porcelain 149 Elgin St, Carlton, Melbourne

Alright, this is really a tea parlor – but it has a special place in Allison’s heart, so I wanted to include it!

cafe-cubano

Coco Cubano 191 Oxford Street, Darlinghurst, Sydney

Wide glass doors open up to the street and patio seating. Inside, leather and wood provide a cozy atmosphere.

img_3859

26 on Ross 26 Ross Place, Lawrence, New Zealand

Delicious, high quality food in a tiny small town.


img_2809

Uncommon 60 Chapel St, Windsor, Melbourne

Very close to some interesting back alley street art. The bliss balls were out of this world and the inspiration for the recipe below.

img_3401

Chop House Arrow Ln, Arrowtown 9302, New Zealand

Just a wee bit hard to find, but the locals will tell you where it is! The food was first rate.

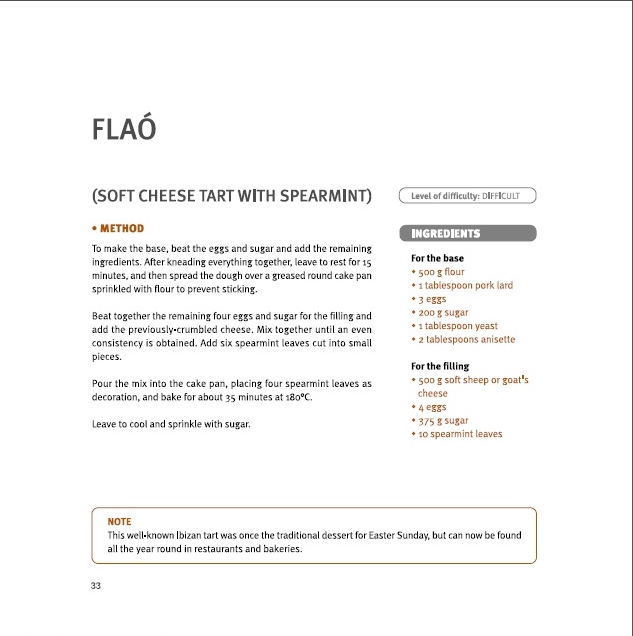
Recipe for Almond Butter Bliss Balls

fotorcreated

Ingredients for six bliss balls:

1/4 cup store bought almond butter

1/4 cup whole almonds

6 dates

2 heaping tablespoons cacao powder

1 tablespoon coconut oil

1/4 teaspoon coarse sea salt

1/4 teaspoon cinnamon

Use a food processor to pulse the almonds until they are like coarse sand. Don’t allow the ground almonds to become a paste. Place in a small bowl and set aside.

Remove the seeds from the dates and roughly chop them. Place the chopped dates, almond butter, cacao powder, coconut oil, salt, cinnamon and 2 tablespoons of the ground almonds in the food processor. Pulse until all ingredients are combined. Form resulting mass into six walnut sized balls. Roll each ball in the remaining ground almonds. They can be eaten immediately but they are even better after being refrigerated for a couple of hours.

Enjoy with a good cup of coffee!

bliss-balls


Another Printable Recipe Archives     fb     tweet (2)     pin     me     instagram_2016_icon

Guest Post: Naptime With Yasmine Makes Time For Melbourne’s Doughnut Time

allison-yates-doughnut-time-2

Editor’s note:  In 2016, my adventurous, world traveling daughter spent most of the year in Australia courtesy of a Working Holiday visa. Her never boring and often hilarious blog, Naptime With Yasmine , documents much of her experiences there.  Last month, Roy and I met up with her and one of our other daughters in Sydney, and then traveled on to Melbourne. While walking around the city, I was enchanted by the window display of Doughnut Time. Besides looking absolutely delicious, the pastries displayed sported catchy little names such as “Yass Girl, You Sleigh” (red velvet with candy canes) and “O Holey Night” (Christmas cream glaze with festive sprinkles). But do they taste as good as they look? Here’s the scoop from Yasmine – but you can call her Allison.

________________________________________________________________________________

Make Time For Melbourne’s Doughnut Time

allison-yates-doughnut-time-5

Look through Doughnut Time’s Instagram . Do yourself a favor and open it now. It’s enough to make me want to jump out of my balcony, into the street, and sprint right down to Degraves Street in the CBD and spend another $6 to satisfy this demanding craving that’s plagued me since the first moment one of their doughnuts grazed my lips.

Doughnut time has become a massive craze. Its hashtag is everywhere, dominating Twitter and Instagram. The line is always out enormously long. Walking past the store, there are, without fail, hordes of young girls instagramming pictures of chocolate filling spewing out of the crispy pastries.

allison-yates-doughnut-time-6


allison-yates-doughnut-time-7

So, if the concept of doughnuts isn’t new, what makes Doughnut Time so special? In an age of nutrition-obsessed, health-conscious consumers, how can a doughnut shop not only survive, but thrive? How can a chain go from one store in Brisbane to selling in over 15 locations just a few months later? The publication Time Out Melbourne even listed it as some of the best doughnuts in all of the city. After resisting for months buying what I claimed was an overpriced item to only make me fat, I finally caved. I set off to find out.

allison-yates-doughnut-time-8

They refer to their donuts as “works of art.” And aren’t they, though? Their website  features an array of unique creations with cheeky names and equally impressive ingredients. They have doughnuts called “The Gluten that Got Away,” “The Ed Sheeran,” and “Glazed and Confused.” Unfortunately their current menu doesn’t include those, but I opted for one that satisfied both my need for a trendy name and my chocolate craving. I didn’t leave disappointed.

I arrived at the Melbourne CBD location on Degraves Street, just a few meters from Flinders Street Station around 1:00pm, ready to take the plunge. I waited in line behind five people, but not for long. Within seconds I was at the front of the line, chatting with the two teenage girls behind the counter. “I’ll have the Zero Chills,” I said. The name of the doughnut I chose (butterscotch glaze topped with Hershey’s kisses and crushed Oreo), a popular slang term to mean that I “do what I have to do,” seemed fitting for the occasion.

allison-yates-doughnut-time-3

They packaged my doughnut in a light blue, retro-inspired takeaway box that had, “Honey, I think it’s time. Call now” and “It’s always a good time” written on the side.  It’s as if they were mocking me for holding out for so long. They knew I couldn’t be kept away forever.

allison-yates-doughnut-time-4

On my way to devour my doughnut in Federation Square, I stopped by 7/11 for some cheap coffee (it’s not even as bad as they say it is). After all, who can afford a $6 doughnut and coffee as expensive as it is in Melbourne ?

I took one bite. The outer edge of the doughnut had a slight crunch, but the inside was moist, fluffy, and utterly irresistible. I smeared chocolate all over my face. I licked my lips and dropped pieces of the butterscotch glaze all over my shirt. I felt full and slightly sick after my third bite, but I didn’t let that get in the way of me finishing the entire thing. I had zero chills about what other people thought. I was enjoying a special moment with this insanely sugary, insanely expensive, but insanely breathtaking dessert.

So, I asked myself again, what makes Doughnut Time so special? It’s the taste for sure. It’s absolutely about the quality. But most of all, it’s about having a fast-food, chic, hole-in-the-wall (literally) doughnut shop that gets us. They know their consumers. We want to have aesthetically pleasing desserts to Instagram and hilarious names that make references we understand. We want to frequent a place that thinks of combinations and creations that are close to home and familiar but widely unheard of and somehow still tantalizingly rare. We wanted it, and we found it. At least I did, anyway. Me and 11,000 other followers.

On that note, please excuse me. It’s Doughnut Time.

________________________________________________________________________________

naptimewithyasmine-photo1

All photos taken by Allison Yates

Please visit the insanely entertaining Naptime With Yasmine , a blog that focuses on people, travel, and living and working abroad with a sense of humor and a social conscience. She is a traveler, but also a feminist and advocate, questioning the impact of her presence and the implications of her actions abroad.

My personal favorite posts have to be the great stories she tells about the year she lived in Ibiza, Spain.

As Allison says, “Have a meaningful, and most importantly, entertaining life.”